Lets Start!
Chimp Studio team warmly welcome you as our valued client. While utilizing JobCareer Theme. It is a complete Job Board WordPress theme that allows you to create a useful and easy to use job listings website . Using JobCareer theme, you can create a complete & fully Responsive job portal, career platform to run human resource management, recruitment or job posting website. JobCareer is not just a job board theme, it’s the best WordPress theme for anyone who wants a simple job script that makes money. Supporting items is not a requirement of the Envato Market places, but if you need support in any matter related to theme, Our help desk is always there.
Installing WordPress
To install WordPress, follow instructions here. WordPress Installation Guide
Attention! WordPress installation is primarily your concern. If you encounter any problem on it, Visit www.wordpress.org & troubleshoot the issue.
Downloading JobCareer Theme
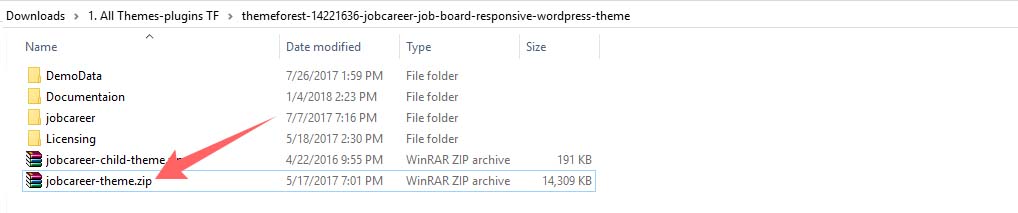
First, after purchasing JobCareer theme, please download the package from Theme Forest. All you need to do is to move your mouse over your login name in right top corner (of course after you`re logged in Themeforest) and then click Download. Here you will find all the items that you have purchased.
In the next step click the Download > Main File(s) button next to JobCareer theme and save package on your computer.
Please unpack (unzip) the whole package after downloading it from ThemeForest. In the package, You will find Documentation, license, zipped file with theme files and folder called JobCareer Theme.
Note: You can upload .zip files in this method of theme installation. No other format is accepted there, and, result will be error in installation.


Plugin Installation
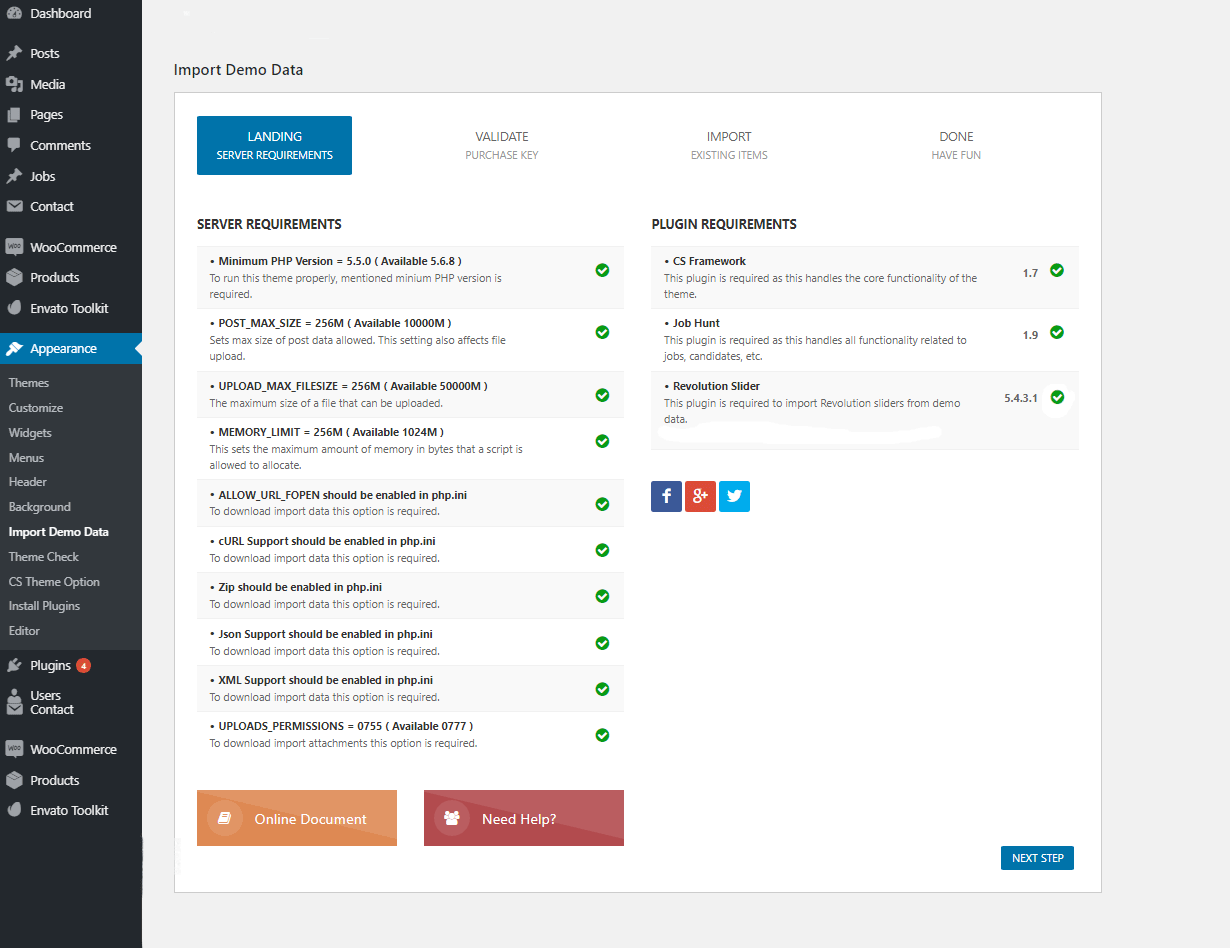
With the activation of JobCareer Theme Help guide theme, you are prompted with admin notices that certain plugins are required for the theme. Following plugins are need to be activated for JobCareer theme to work properly.
- WP Job Hunt (Required)
- CS Framework (Required)
- Slider Revolution (Required)
- Contact From 7 (Optional) This theme have custom contact form. For extended contact forms, activate this plugin.
- Envato WordPress Toolkit (Optional) view your ThemeForest purchases within the WordPress dashboard and quickly update your theme without losing any data & settings of theme.
You can activate these plugins by two methods;
1- Click the “Install Plugin” link which comes along with the admin notices to activate these plugins.
2- If you are prompted with any admin notices, you can activate these plugins by navigating to Appearance > Install Plugins section.
Note: Required plugins must be activated, otherwise theme will not function properly. However, optional plugins are your choice. Activate them only if they are required.


Thumbnail Sizes
If you are migrating from another theme which uses the native featured images functionality of WordPress, please use the Regenerate Thumbnails plugin to resize all the thumbnails. Click the link and download free Regenerate Thumbnails plugin , read thoroughly all the steps it contains for any kind of assistance. The plugin documentation/help file contains all the information you need.
Run Demo Slider
Revolution Slider comes wrapped with JobCareer Theme for Free. It is a premium slider available as a WordPress plugin. It has gained huge popularity in the WordPress community due to its huge range of features and ease of use. Install Revolution slider from : Dashboard / Appearance / Install Plugins / Install Revolution slider (Activation is not required incase bundled with theme!)
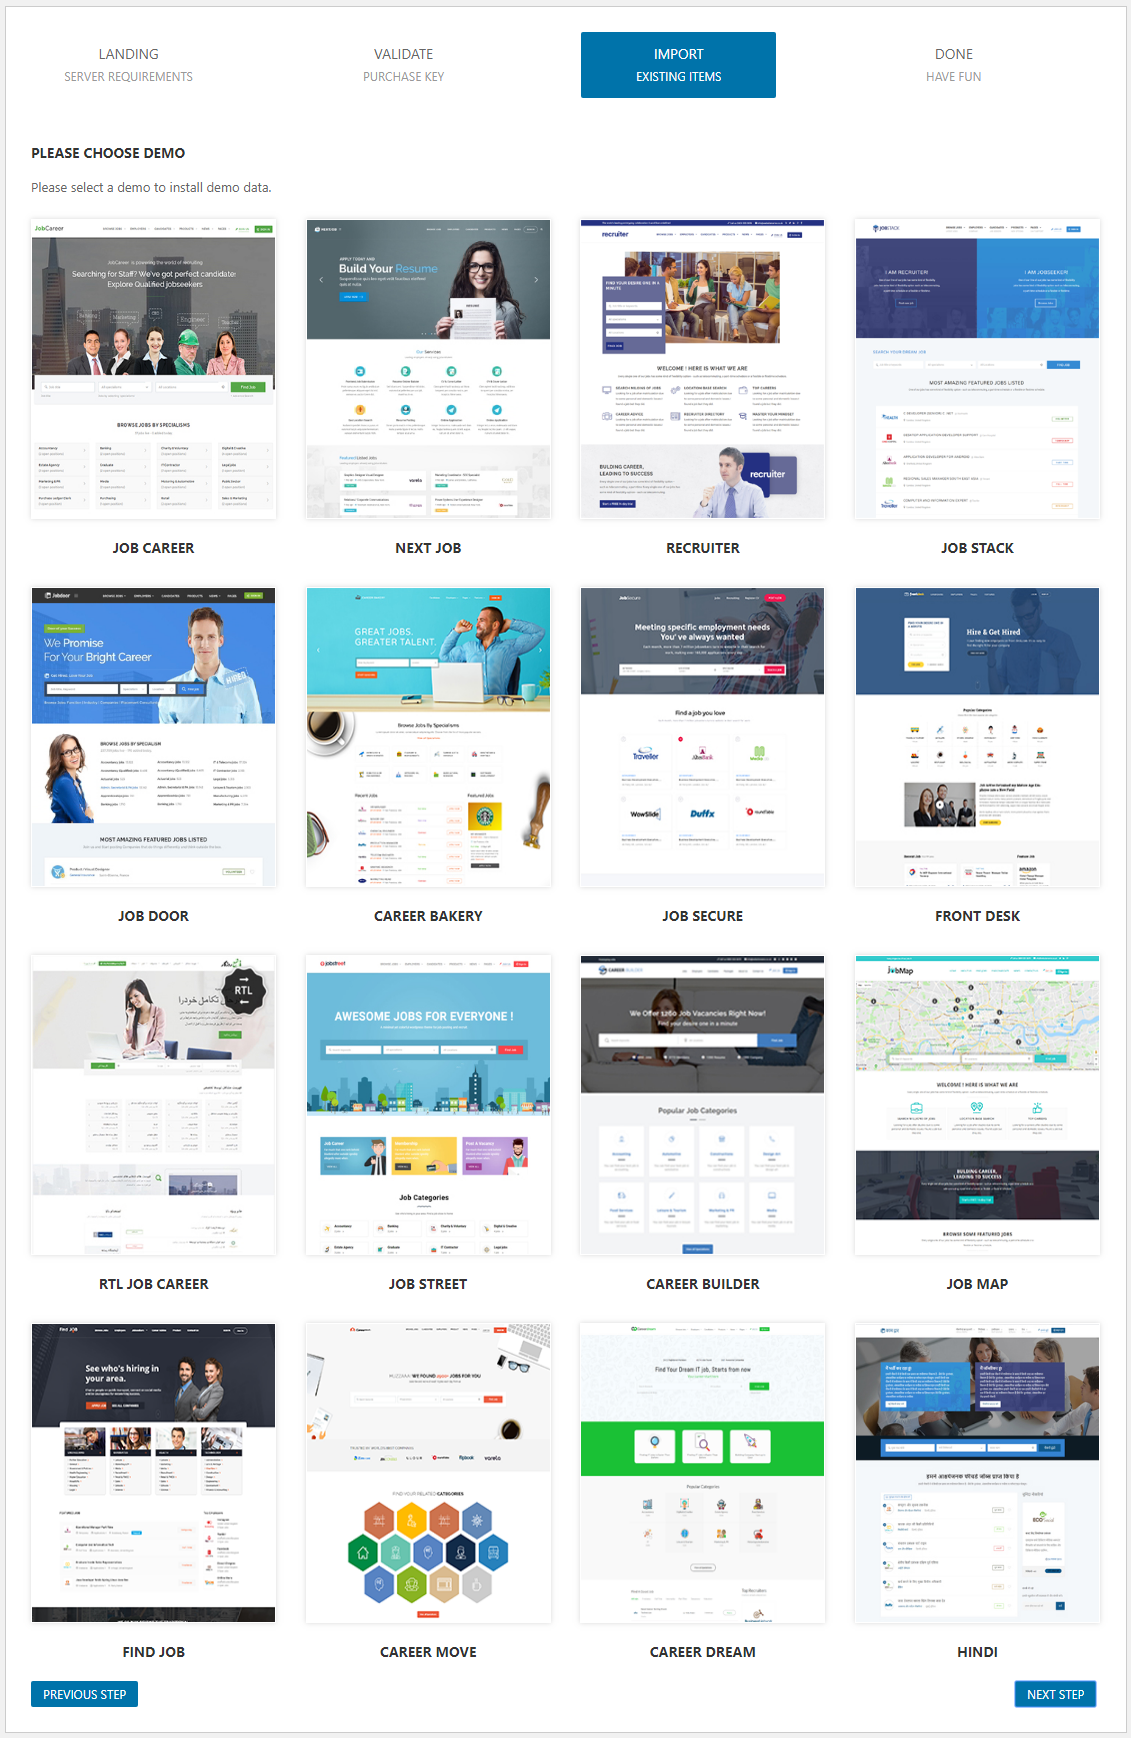
You can easily import any desired demo slider from : Dashboard / Appearance / Import Demo data / Choose Desired demo / Validate Purchase code / Choose Revolution slider / Click Next to import successfully.
Child Theme Configuration
If you don’t want to modify the theme files every time you update the theme, you have to create the child theme to modify the php code for this. You can find the tutorial about how to create the child theme here at Child Theme Configuration Our theme wrap every function with if( !function_exists(‘some_function’) ) command, so if you want to use any function, just declare it in the function.php file of the child theme and it’ll overwrite the existing one.
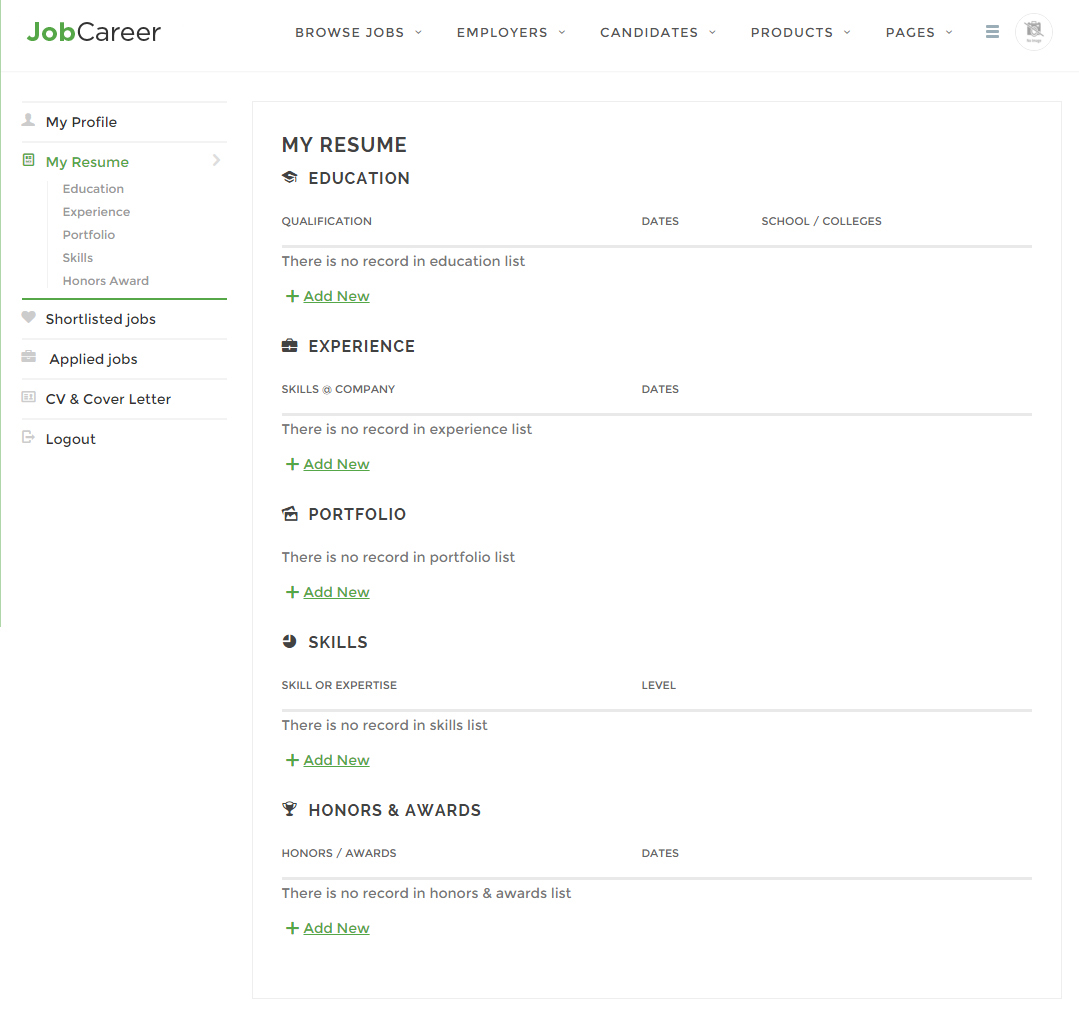
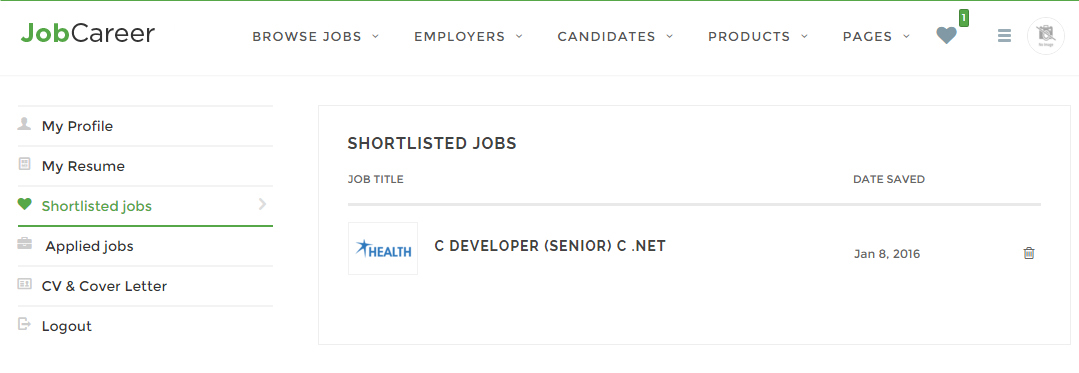
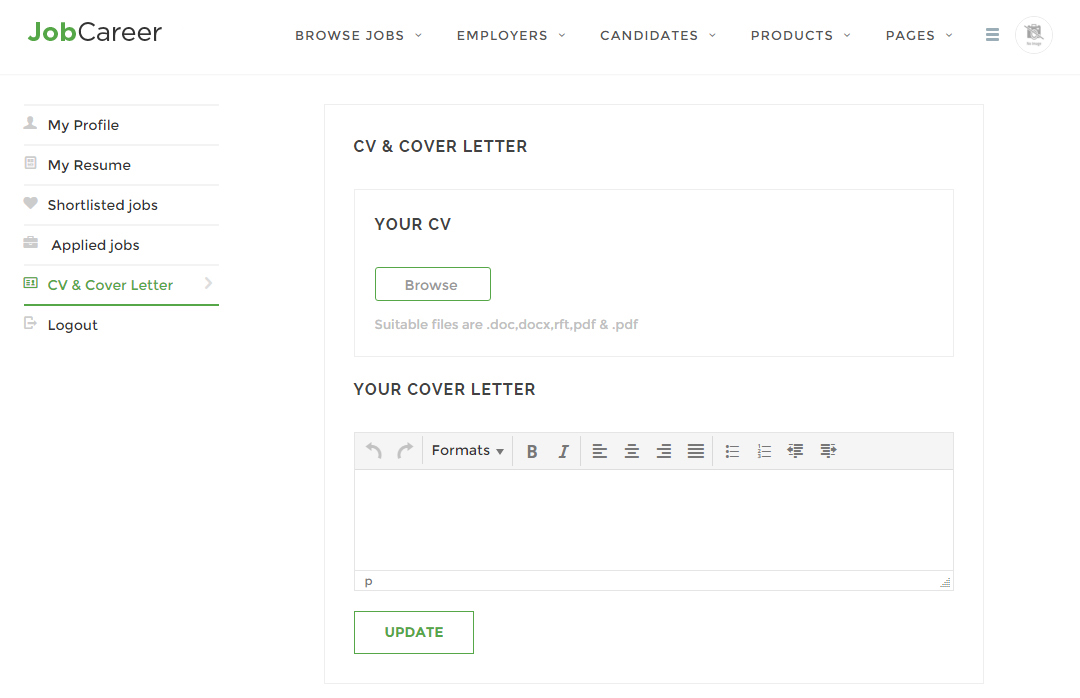
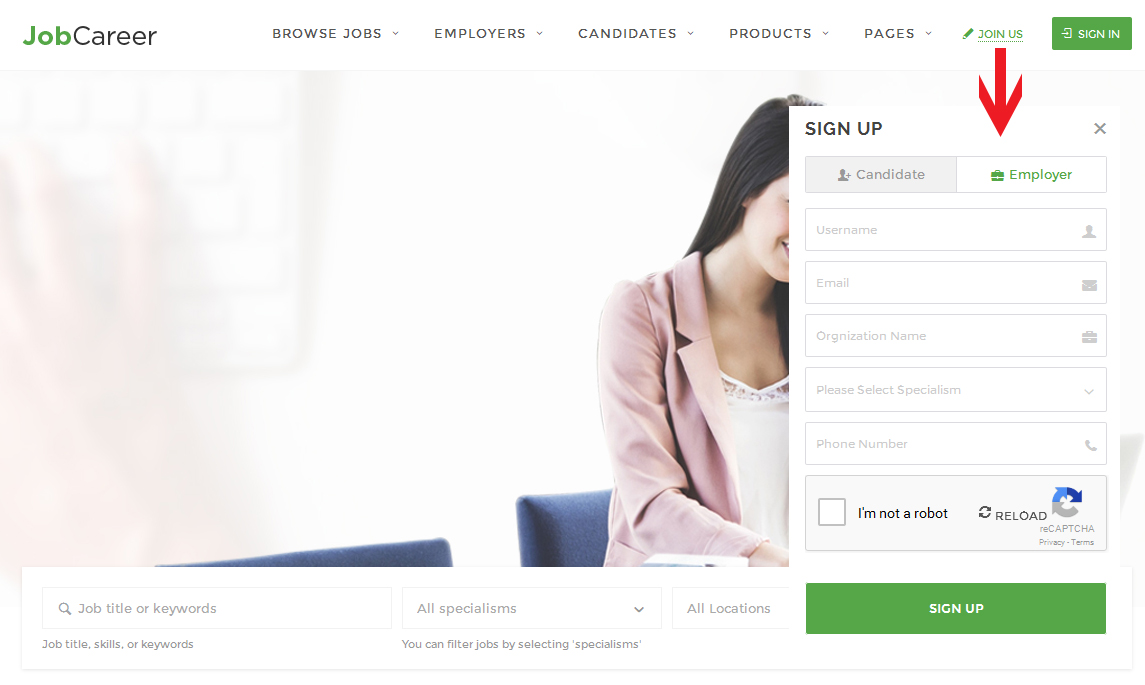
JobCareer features


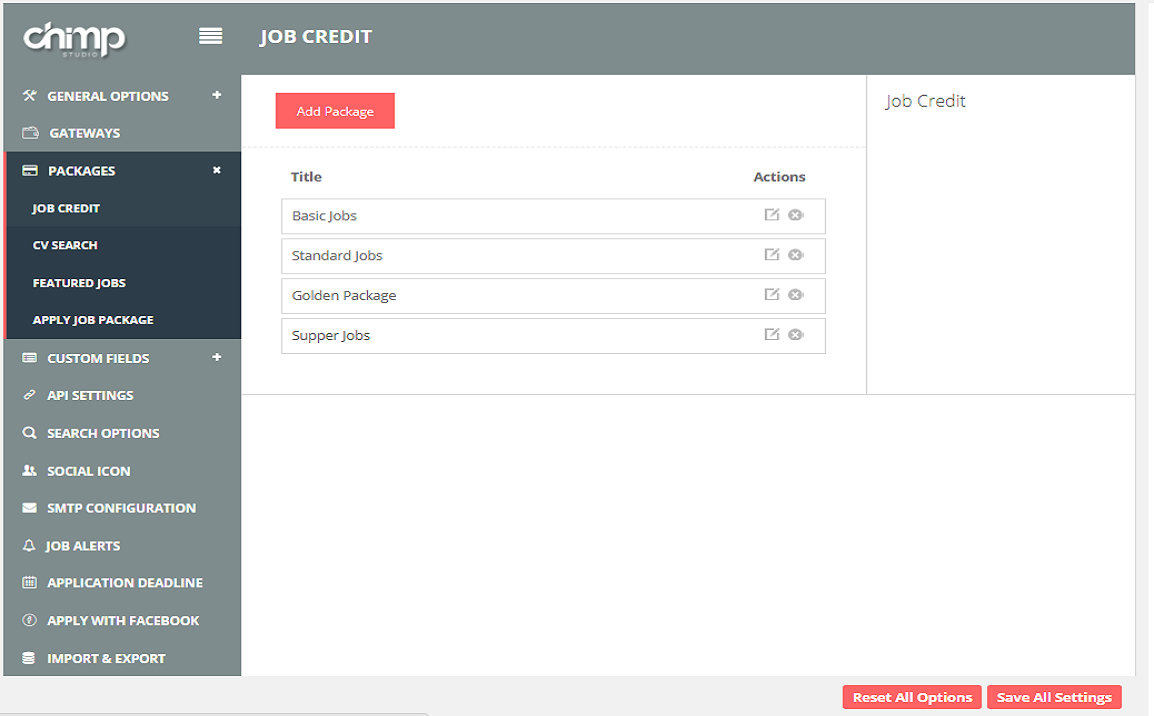
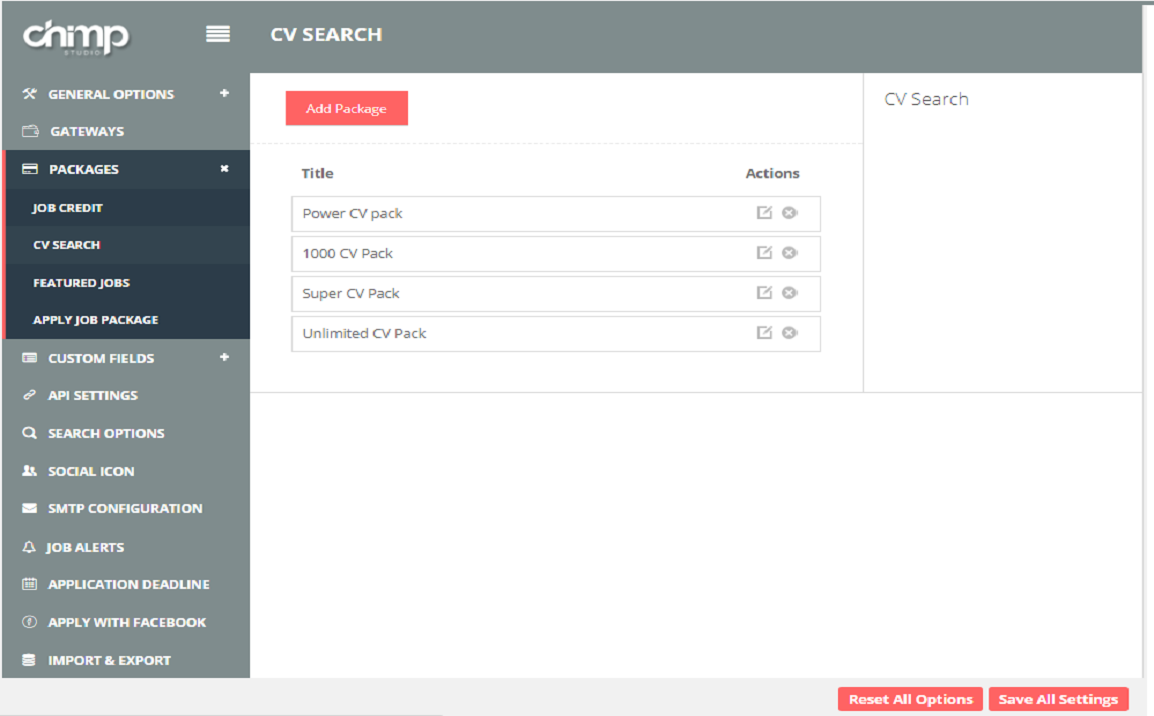
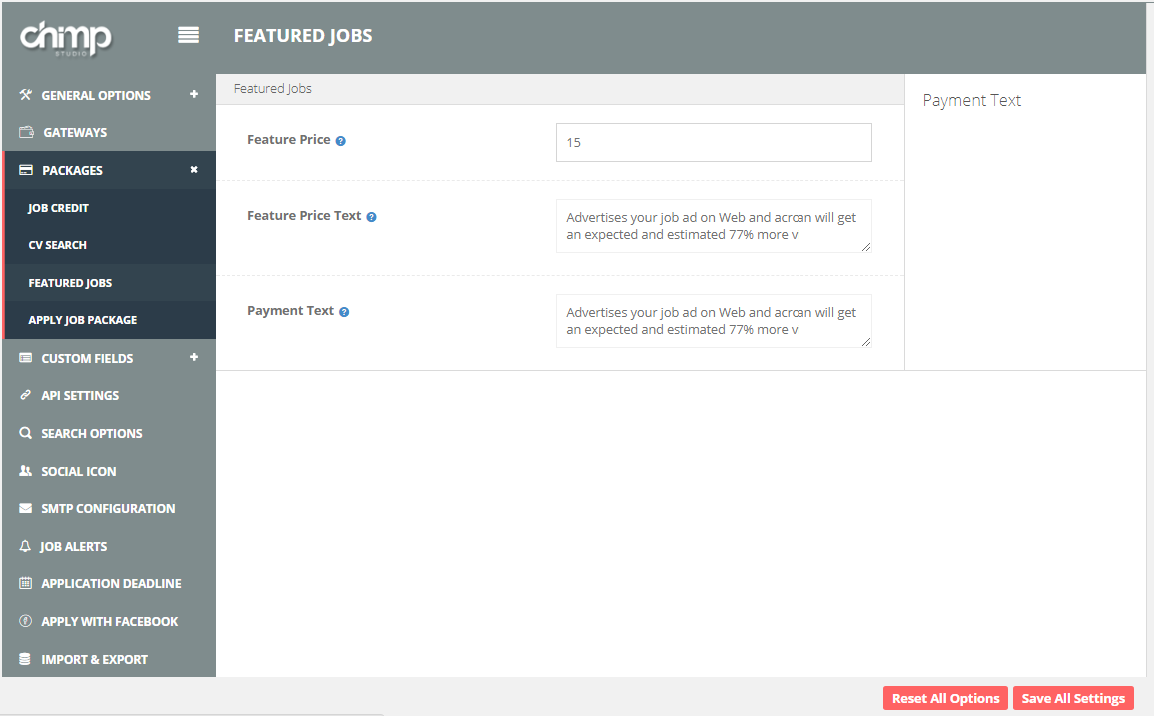
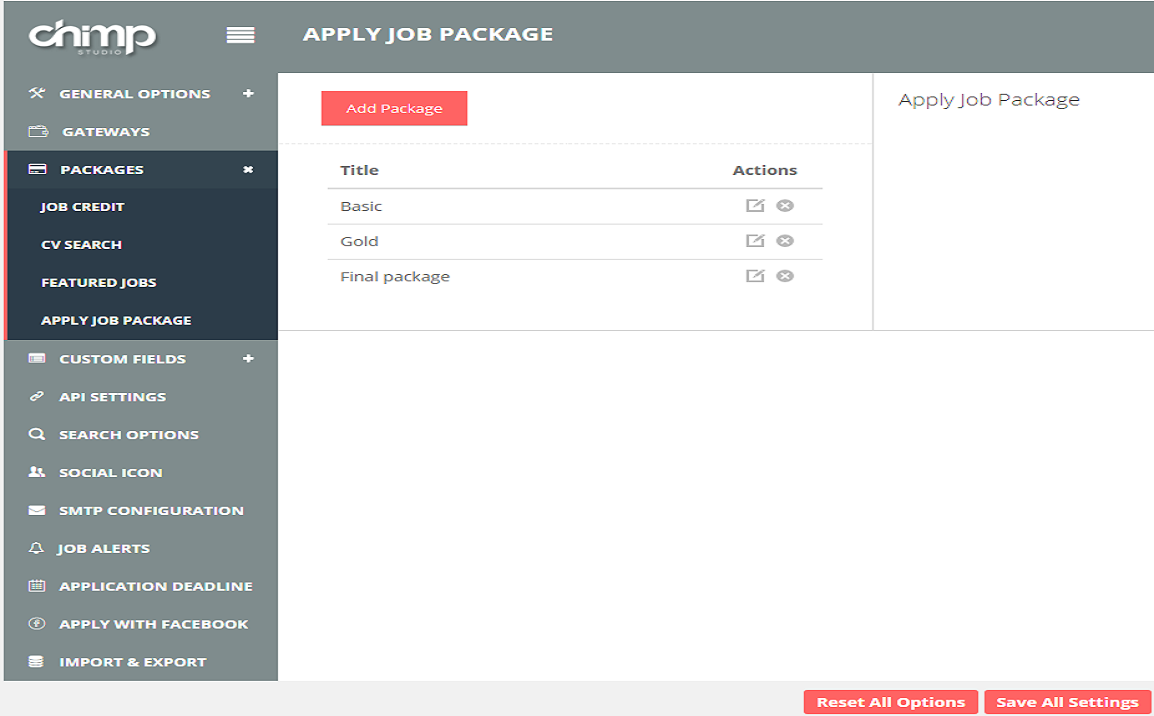


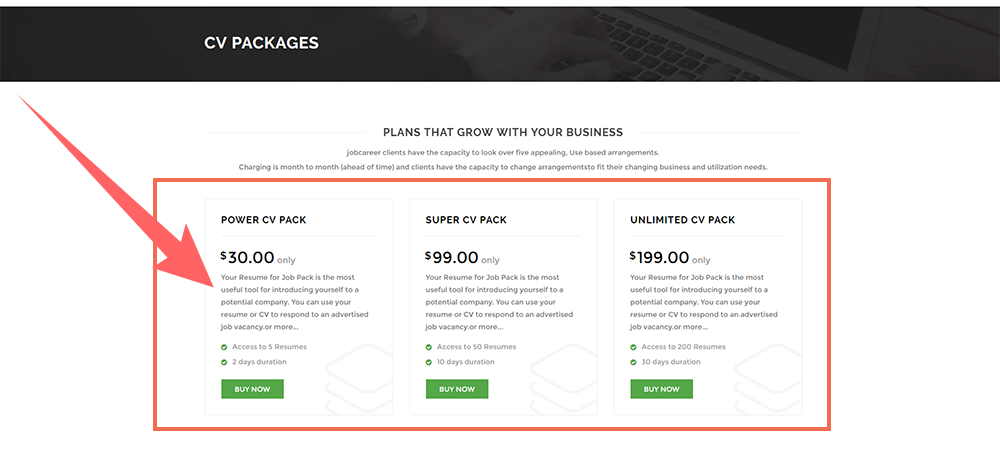
JobCareer Addons
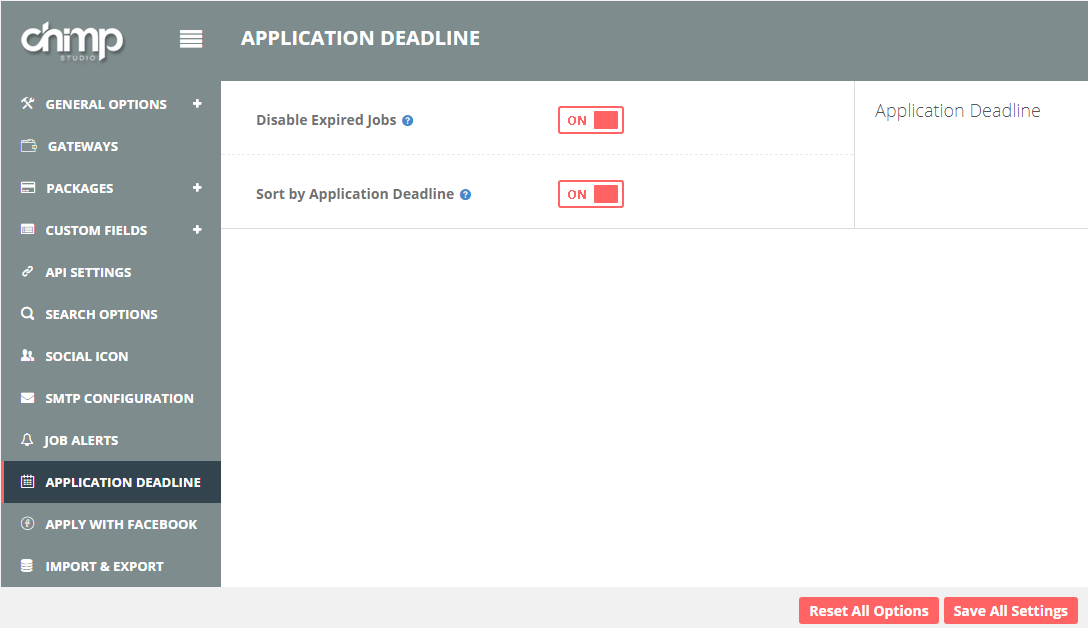
Job Alerts/ Save Search
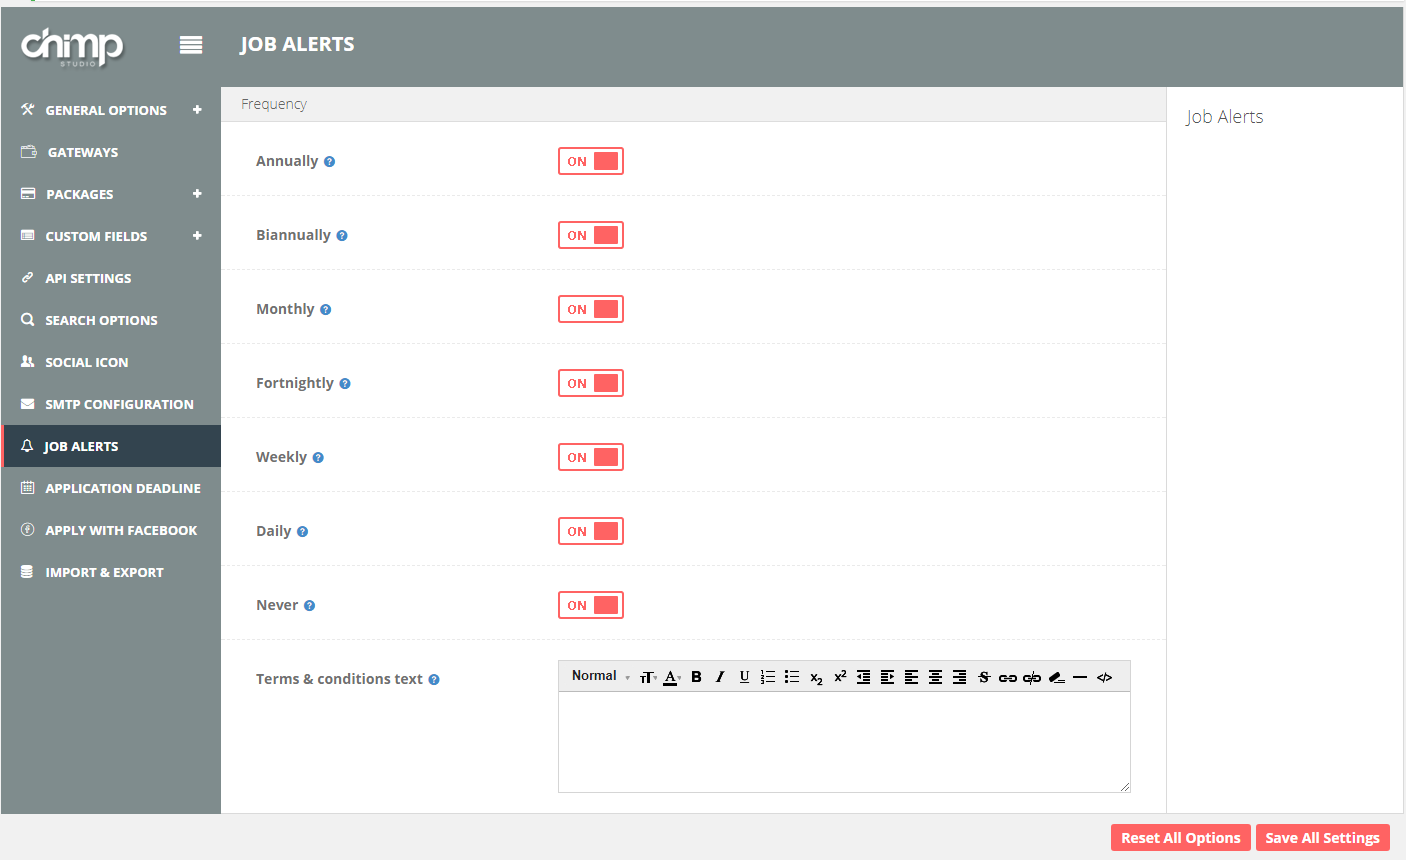
How to Save Search?
This stunning and flexible feature notifies you about newly available jobs and lets you select the jobs rightly matched with your interests and skills based on your searches. Follow procedure that will help you save your searches.
- First of all filter your desired job using Advanced Job search filter.
- Click "Email me job like these" button to open job Alerts box.
- Enter Job Alert Name
- Enter Email address
- Now, Click "Submit button" to set Alerts on your job portal. All done!


.png)

Blogs


Blog Post Format
You can make the blog post front end view as per your desire. You can achieve this by following steps mentioned below;
Step-1 Navigate to admin side of the theme and click on Posts -> Add new post. Add the title & post content.
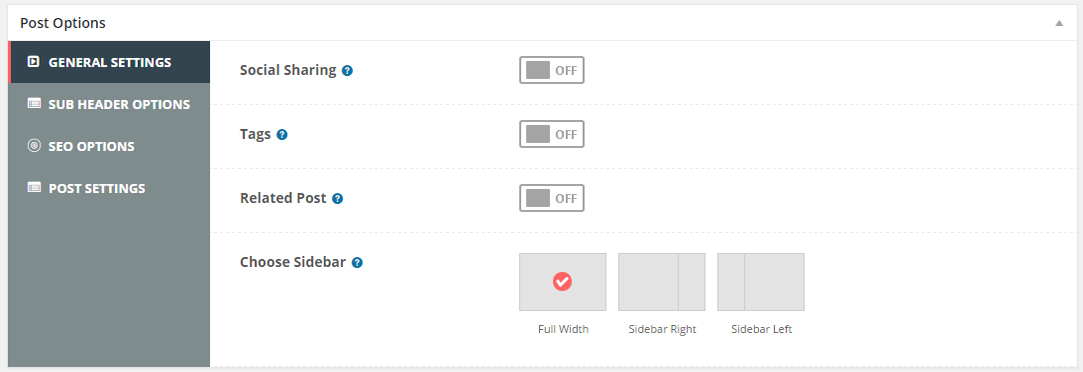
Step-2 You can achieve following settings for post format;
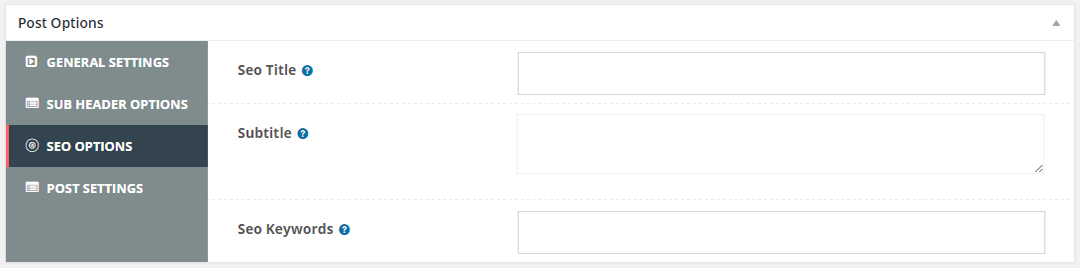
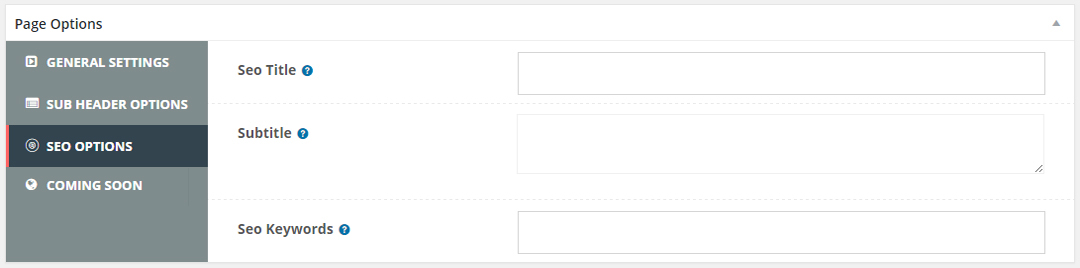
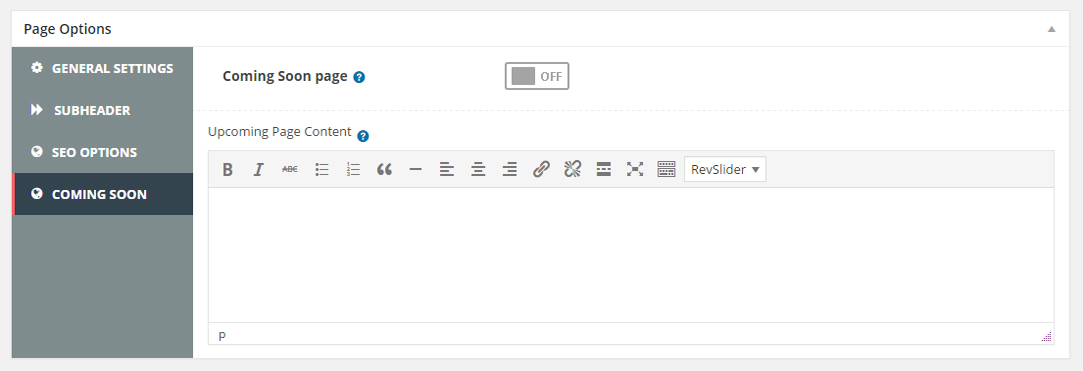
General Setting
Sub header options
SEO Options
Post settings
Functionality & options of above 4 sections have been described in “Add New Blog” section of the documentation.
Blog Other Views
To set front end view for your blog post as per your desire, just follow simple and easy steps mentioned below;
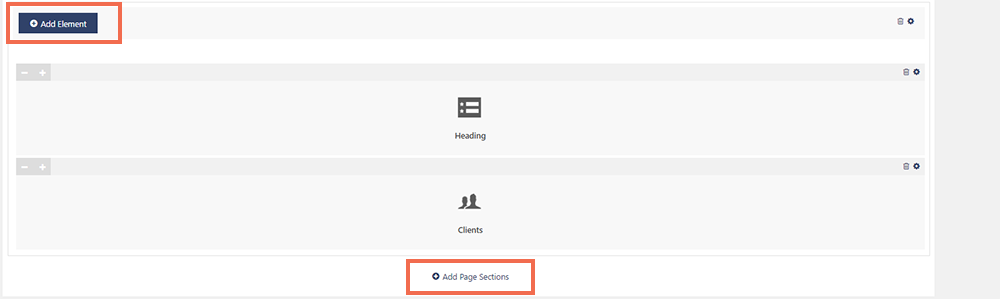
Step-1 Navigate to admin side of the theme and click on pages from left side of your admin.
Step-2 Click on Add new page or Edit any existing page. Give page title and enter description for it.
Step 3- Go to lower section of the page and find “Add Page section“. Click on it and then click on the “Add Element” a pop up window will open.
Step 4- Select a Blog Element from here & then click on edit tab.
Step 5- As soon as click on it, a pop up window will open which is “Edit Blog Options”
Step 6- Select the Blog design view from the drop sown as per your requirement. Click on “Save” button. Publish or update the page & all done!

SiderBars


Sliders
Sub-Header Slider
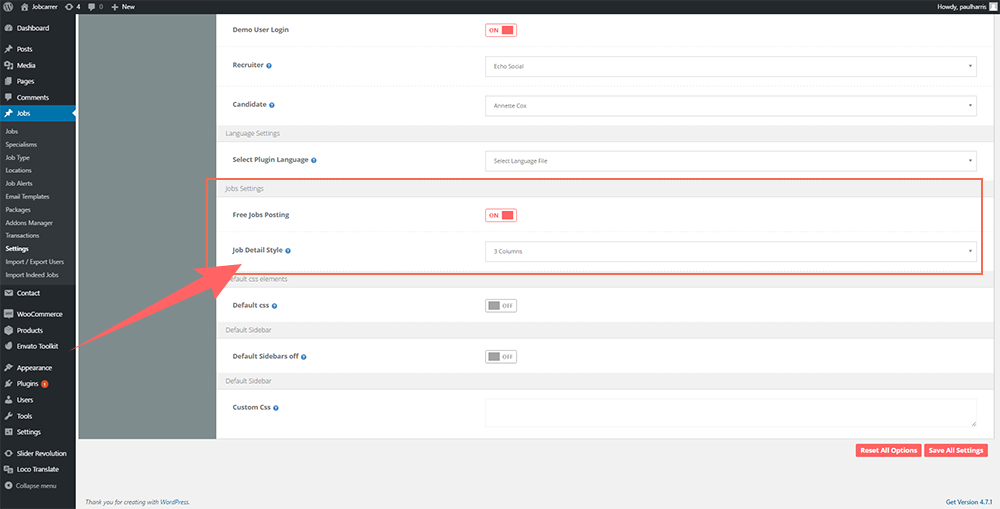
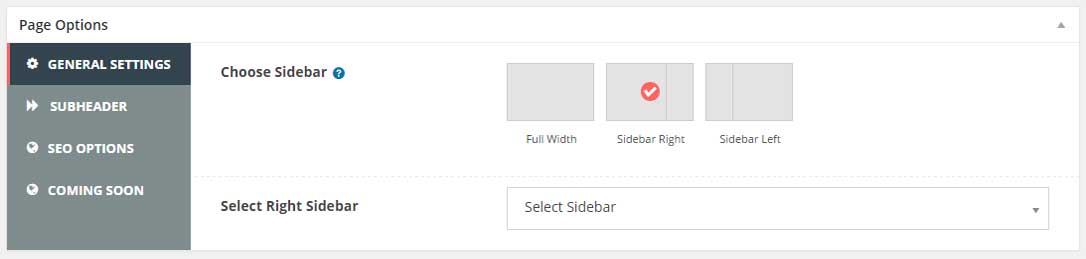
Step 1- Navigate to Appearance and go to the CS Theme Options > General settings area and Click on SUB HEADER Button. A page will open on the right side.
Step 2- Choose sub-header from Default option. As you will click the Default, drop down will appear, you can select any Sub Header of your choice from here.
Step 3- There are some other settings option for sub header which are self-explanatory. You can use those settings for sub header further customization. Save Settings & All Done!
Further, following customization are possible in this area;
- Set Page Title as per your choice
- Align content text
- Turn Page title ON/OFF
- Set Title Heading Style
- Turn Breadcrumb ON/OFF
- Set Background color & image of your choice
- Set text color of your choice
- Border Color
- Set Parallax ON/OFF
(These options can only be selected if the Revolution slider is already installed on your site)
Using Revolution Slider
Chimp Studio theme provides the option to use the slider anywhere you like. You can use the slider on any post or page. For example, if you want to use the created slider on home page, follow the following path.
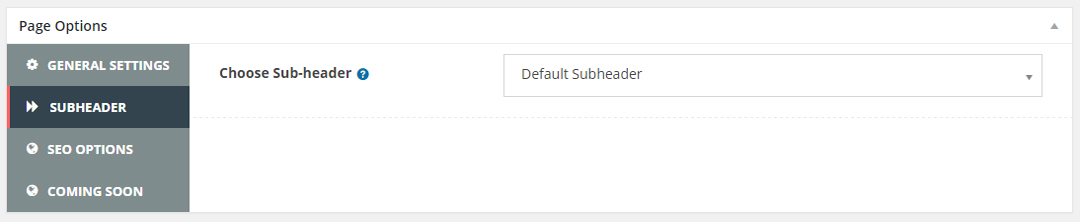
Step 1- Once the sliders are created, navigate to page that you have set as Home Page.
Step 2- Edit the page (which is set as Home Page) & > Navigate to the CS Page Options when is just under the CS page Builder Options.
Step 3- Go to SUB-HEADER settings on the left side. As you will click the “Choose Sub-Header” button, a drop down will appear.
Step 4- Select the option of Revolution Slider from the drop down. Choose any slider (from those you created in revolution slider) from the drop down and update the page.
This option can only be selected if the Revolution slider is already installed on your site.

FAQ’s
General
What should I do if I face any issue regarding JobCareer theme?
The greatest approach to ask your questions is to send via support forum. We have dedicated support department to help you with your issues that might arise concerning Autocare theme. Please consider following suggestions if you face any issue regarding Autocare theme.
- Your site has no server issue regarding your hosting service.
- You have tested by deactivating third party plugins that might not be the reason of conflict.
- Make sure you have latest version of Theme and (recommended plugins) in order to avoid any compatibility issue.
- You have sufficient backup of your site and database with you.
- Make sure you have gone through theme’s documentation thoroughly. You can find theme’s documentation with in theme’s folder that you had downloaded from theme forest.
If still any issue persists you are welcome on Chimp studio support where you will get best possible solutions for your queries.
Facing php error while Uploading theme via ftp?
You may face this issue because of your ftp configurations, which had minified code. Please make sure the following before you upload your theme via FTP.
Settings for FileZilla FTP client
- Click Edit >> Setting
- In settings pop up. Look for Transfers >> File types >> Auto will be selected.
- Change it to Binary
After this settings upload your theme it will work for you.
To avoid style sheet missing error, Upload only the theme files instead of the whole files that you downloaded from theme forest. First extract the downloaded package, locate theme zip file in it after extraction and upload that file. It will work fine for you.
How to tackle White screen of death (WSOD) on theme activation?
If you see WSOD, on theme activation, following could be the possibilities:
- Your php version is below 5.3 or earlier,
- There can be some error while uploading theme via ftp.
- Any third party plugin may causing compatibility issues.
- Memory Exhaustion
- Mistaken changes in functions.php
Solutions:
- Upgrade your php version above 5.4
- Your ftp configurations could might be the reason to fix it, see FileZilla FTP client settings.
- If you are unable to access your dashboard, log in to your website via FTP. Locate the folder wp-content/plugins and rename the Plugin folder plugins_old. This will deactivate all of your Plugins.
- Increase your PHP memory limit by modifying the wp-config.php file. Simply add the following line:
define(‘WP_MEMORY_LIMIT’, ’64M’); - Revert to the original functions.php file to resolve.
This notice means that uploaded theme zip file is larger than max upload file size allowed in configuration of your server. It is advised to either increase that limit or upload the theme via ftp later activate from WordPress dashboard. See requirements here : http://chimpgroup.com/wp-demo/documentation/documentation/jobcareer-docs/#article-3018
Why I am not able to create another ticket?
By default system will allow you to create one ticket against single purchase code. You can place your queries in the same ticket.
What to do to make my site multilingual?
Use WPML plugin to make your site multilingual, Moreover see the documentation to understand how this work: https://wpml.org/documentation/
Warning: Cannot modify header information – headers already sent by (output started at….) It is usually because there are spaces, new lines, or other stuff before an opening tag, typically in that specific php file. This could be true about some other file too, so please check the error message, as it will list the specific file name where the error happened. Remove spacing’s or replacing the faulty file with one from your most recent backup will surely fix your issue. < ?php tag or after a closing ?>
Can you recommend me Third party plugin for my needs?
Third party plugin can’t be recommended as official compatibility assurance is not provided with the theme so advised to use only recommended plugins along with the theme. What is
Child theme and how can I create it?
A child theme is how WordPress help you add code or customization to a “parent” theme without truly modifying parent theme. We suggest everyone use a child theme when setting up their site to avoid any potential loss while theme version update. Please follow the link given below, in this way you can create child theme & modify it as per your requirement. https://codex.wordpress.org/Child_Themes
My site links are broken after moving WordPress site to another directory?
In order to move your WordPress site from one directory to another you must need to follow migration standards to work properly as while migrating permalinks and site link changes as a result you may face issues. Follow link to migrate to another directory.
https://codex.wordpress.org/Moving_WordPress Why my contact form is not sending email?
- Make sure you have added valid email address in contact form Element.
- Check by deactivating third party plugins that might conflict with theme.
- If still issue persists ask your hosting provider to enable wp_mail() function for your site to fix your issue.
Where I can add custom css on my site?
There are several ways to add custom css to your site:
- Add custom css in Dashboard /Appearance / CS Theme Options / General / Custom Code
- Add custom css in style.css Create a child theme
- Create a child theme
Demo Data Import
I activated my new theme and it doesn’t look like the demo. What’s up with this??
There are typically a couple of things you’ll need to do to get your theme setup and running like you see in the demo.
- Setup demo content
- Get theme options setup
- Setup your Homepage
Read More knowledge base articles to setup here : Installation & Upgrades
Why my demo data doesn’t look identical as per live demo of JobCareer theme?
To have demo data as per live demo of JobCareer theme, Please check server Requirement here : Requirements to Import demo data
Homepage Doesn’t Look Like The Demo?
To setup homepage for your site: Dashboard / Pages / Add New page/ Home Than go to Dashboard / Settings / Reading settings > Front page displays / Select your homepage and save.
Why Images not imported with demo data ?
In order to install demo data with complete Media as well Follow below steps: Requirements to Import demo data
– Login to cpanel / Public html / wp-content / Uploads (Here permissions should be 755 for all folders and files) than it import fine.
Updates
How do I update theme without losing customizations?
Please go to theme forest download dashboard, select “Download all Files”, get the latest updated files.
You can either upload the jobcareer.zip from your downloads on Theme Forest after purchase or upload the unzipped theme files to your WordPress Themes folder over FTP.
Configure following FileZilla FTP client settings before uploading theme via ftp in order to avoid code minimization (WSOD) while theme upload.
- Click Edit >> Setting
- In settings pop up. Look for Transfers >> File types >> Auto will be selected.
- Change it to Binary
Note: Make sure you have maintained sufficient backup of your site and database with you before theme’s update.
How Do I Update Included recommended Plugins?
Theme includes several great plugins which greatly enrich the functionality of the theme. While these plugins could be placed inside the theme it’s much better to keep them as separate plugins. However, this means that plugins will have to be updated separately from the theme update.
Note: Always check Change Log while theme update, don’t forget to update plugins as well. If any!
I’ve Updated My Theme And All My Changes Are Gone?
The most likely cause is that you made manual changes to your template files such as the style.css file (usually). Then when you updated everything got overwritten with the default theme code. To avoid it follow suggestions.
- Maintain backup of your customization so you can be able to add and replace after update.
- Creating a child theme is perhaps the best technique of customizing your theme and will provide the greatest flexibility and even allow you to edit template files (besides just style.css), remove or add new scripts as well as add custom functions.
- Preserve Changelog – Whether you are editing the template files manually (best no to) or using a child theme, creating a changelog is a good way for you to keep track of all the twists you’ve made to the theme.
How to locate My Current Theme Version?
It’s very important to keep your theme up to date for bug and security fixes and to receive new features. Always check the changelog to see if latest version of the theme available for purchase/download.
To find out what your current version is you can do so in your WordPress dashboard under Appearance > Themes.
Optimizations
How can I improve my site performance? My website is too slow. Any suggestions?
- Reduce the size of images. You may use this platform : https://tinypng.com/
- Use WordPress cache plugin i-e WP super cache.
- Choose best hosting service for your website. (Performance can’t be assured incase of shared hosting server.)
- Remove Unused Plugins
- All configurations must be done in php.ini file but not through user.ini file that will over ride it locally.
Other
Custom Post Type 404 Error: Not found, not able to access detail pages?
You may experience problems with 404 errors for custom post types while viewing detail pages. To resolve try the following steps:
- Ensure that none of your Custom Post Types and single pages have the same name. If they do, rename the single page, including updating the slug as well.
- Log in to your WordPress Dashboard, navigate to Settings > Permalinks. Select the default permalinks. Save. Then reselect your preferred permalinks. This will flush the rewrite rules and will fix your problem.
How to fix image upload issue, Media gallery images appears to be broken?
Issue is most commonly initiated by wrong file permissions. Your uploads directory should have correct file permissions otherwise WordPress will not be able to store your files in it or sometimes may not even display files from the upload directory. To set correct file permissions for your uploads directory, you would need a FTP client, like Filezilla. To resolve follow steps:
- Connect to your website using the FTP client and then go to /wp-content/ directory. There you will see /uploads/ folder.
- Right click on the uploads directory and select file permissions.
- Set file permissions for uploads directory itself and all the sub directories inside it to 755.
- Restart Filezilla will apply file permissions to the directories.